
Understanding how flavour travels through the entire process of making espresso is important if you want to get the best taste from your homemade coffee. There are a lot of different myths about how to make the perfect coffee and I’ll give you my thoughts on these in this blog but, making coffee is not just a science, it is also an art which means sometimes you have to be creative within the rules.
I’ll attempt to make it easy for you to understand each step but there are a lot of words that may be foreign to you so bear with me as I try to explain how to get the best flavour out of any home espresso machine.
It all starts at the very beginning of the coffee making process…
BEANS
Beans, glorious beans! If you start with horrible beans, you can’t undo the flavour. Don’t buy beans from your local supermarket and expect them to taste great. Who knows how long the coffee has sat on the shelf. Likewise, cheap beans aren’t going to be very full of flavour because like most things, you get what you pay for.
Luckily we sell the best flavoured beans right here. So, if you are looking to buy coffee we’ve got you covered. Cheap beans aren’t necessarily the only type of beans that taste bad, you can have excellent coffee beans that are really old or have been incorrectly stored that will taste equally as bad. So how can you tell if beans are not very good? Well, if you don’t know how long they have been sitting there then look at the bean to see if it is quite oily/shiny. The oils should be on the inside of the bean so if it looks like Mr Olympia 2014 just before he walks on stage, then you can safely assume it’s a has-bean and put that in the bin.
Another way to tell if a bean is not great is to watch the way the shot pours but this is covered later on. But having good beans is just the first step. You need to keep them in a great condition if you don’t want to have to buy beans every day. That’s why storage is key.

The flavour journey begins here. If you don’t purchase good beans then you can’t expect good coffee.
STORAGE
You may not think it, but storage is probably equally as important as the bean quality itself. Coffee is an extremely volatile substance affected by nearly everything: oxygen, moisture, heat, cold, humidity, sunlight, etc. The best place to store your coffee is a cool, dark cupboard in an airtight container.
Myth: Coffee is best stored in a freezer. WRONG! Ever tasted an apple or tomato after it has been defrosted? Like most fresh fruits and vegetables, freezing causes coffee beans to lose all their flavour.
Some coffees have better longevity than others but as a general rule you shouldn’t keep coffee longer than a month. Ideally, you should drink it within a week, but most of the time at home this is not a very practical solution. Store the beans in cool, dark, spot in an airtight container. The best place is a wine fridge but if you don’t have one, use a dark cupboard. Ideally buy fresh beans every week but at least every month. Don’t grind the beans until you use them if you can help it because as soon as the bean is crushed its starts to release its flavours and those are the flavours you want in your coffee not in the air.
GRINDING
Grinding has always been sort of a scary thing to do for most people. I remember working in a cafe where no one was allowed to TOUCH the grinder. Well, what effect do you think this insane rule had on the coffees? When it was a hot day with high humidity the coffee was shit, when it was a cool, dry day the coffee was good. Which days do you think I called in sick to work?
The reality is, you should never fix your grinder at just one spot and scare anyone into never touching it again. Even if you are in a completely controlled environment, coffee beans are not created equal and you will always need to adjust for them. So instead, you should become confident about understanding how a grinder works and how to adjust the grind to get a better coffee.
There are two types of grinders: Blade grinders and conical grinders and it’s important to know which one to avoid. A conical grinder is by far the best option as it gives you greater control over the grind and keeps the grind consistent whereas a blade grinder often creates an inconsistent grind with some being super fine and others being quite coarse. Of course, conical grinders cost more, but if your coffee is important to you then I would always invest the extra dollars in the conical grinder.
Setting up your grinder:
Expect to waste a lot of coffee doing this. Some grinders are very sensitive so if you know that your beans are good and that you tamp consistently (see the next section) you can easily see the effects the grinder has on the pour.
- Start at any point on the grinder and see how the first shot comes out. If it gushes out like milky water then you are way to coarse and so you’ll need to move the dial in the direction of a finer grind.
- Run another shot again and, if this time the coffee just drips out, it means you have dialed the grinder too far towards fine. So go back the other way (but not as far as the first one) and try again.
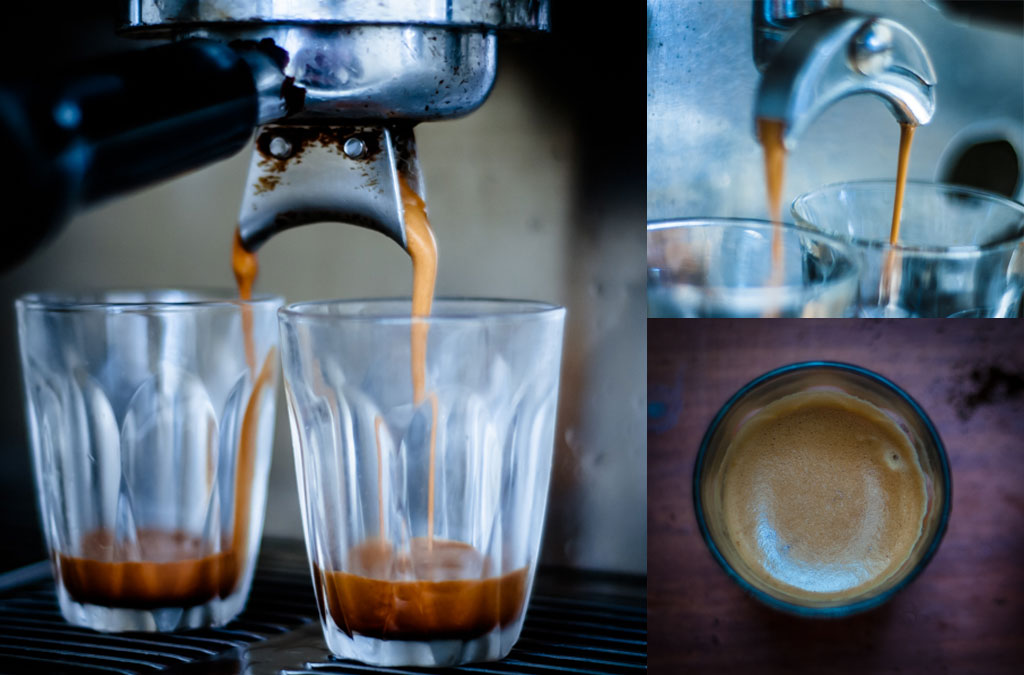
- Keep repeating this method until you hone in the perfect pour which should look like melted honey. (see the image below)
- Once your shots are coming through nice and slowly, without waving about like water or dripping, you can leave your grinder set here and then just tweak it left or right when you notice that the coffee isn’t pouring perfectly.

The Perfect Pour is like the Mona Lisa or the Sistine Chapel.
TAMPING
Water is a lazy substance and it will go the easiest route. So, if you tamp the grind so it’s completely flat and interlocked then the water has to work extra hard to get through the grind and in doing so, picks up all the flavours of the beans.
There are many different types of tampers on the market and choosing one can be tricky. You definitely don’t want to use the plastic one that ships with most home machines – you might as well use a piece of string. Get a good solid metal one that fits in your palm and feels good to use.
MYTH: You should create layers of coffee in the filter basket by dosing a bit first, then tamping, then dosing some more, then tamping again. WRONG! I have no idea where this school of thought came from but I believe it has something to do with trying to create an even compression throughout the basket. The problem though, is that it creates a very fine gap between the layers which will let the lazy water do what it wants.
First, start with filter basket heaped with coffee grind and then using the back of your little finger, scrape away the heaped coffee to level off the basket. Rest the portafilter head on a flat surface, and using the tamper, apply about 14kgs of pressure to the coffee whilst twisting the tamper in a clockwise direction. If you have no idea how to tell 14KGs of applied pressure, that’s ok, neither do I. So here’s the trick that will help you get somewhere close to that:
Look at your filter basket (see image below) and you should see a small ridge/indentation that runs around the circumference (about 2-3mm down from the top of the lip). If you know you’ve got the grind right then when you apply pressure to the basket of leveled coffee, you should end up with the compacted coffee sitting just inline with that ridge.
Make sure you rotate the tamper clockwise when applying the pressure as this interlocks the grind which creates more resistance for the water to travel through. Sometimes when you tamp, you’ll end up with grind squished to the sides of the basket above the ridge so you should give the side of the basket a light tap to knock the grind off and then re-tamp lightly to “polish” it. Be careful not to knock the sides too hard because this can separate the coffee “puck” from the sides of the basket and this allows the lazy water to go straight down there instead of forcing its way through the puck.
If your puck doesn’t look level (as in, you can see it’s above the ridge on one side of the basket and below the ridge on opposing diameter, then get the grinds out of the basket and start the process again. If you try to run the water through an uneven tamp, you’ll get some flavours that you don’t really want in there.
One last thing, you have about 30 seconds to get the grinds into the basket, tamp it and then begin the pour so if you are trying to read this as you make it; better learn to memorise.

The Portafilter (left) with my first ever tamper (custom lathed) and a filter basket (right)
Click here to finish reading In Part II
we cover:
- The perfect pour
- Steaming milk
- Machine Maintenance
If you want to see some of the coffee we offers check them out here.
10 comments
Anonymous
Hi Rhea,
Yes, unfortunately, the Barista Express has had these inconsistency reports for many years. It’s a pity because the Dual Boiler is so good. They have released a new model called the Barista Pro which takes a lot of the technology of the Dual boiler and uses that which is much better. Of course, that doesn’t help you.
I would watch how the grind pours and if it’s dripping, you need to adjust the grind to be more coarse. This may be causing the burnt flavour.
The grinder isn’t a set-and-forget process, it needs to be fluid. You will need to watch each shot as it pours and make adjustments as necessary. As the coffee ages or the weather changes you’ll need to adjust the grind.
Cheers,
Ryd
Rhea
Thanks Alex! I’ve recently bought the Breville (Sage) Barista Express and have had a bit of a love hate relationship with it. It started well, managed to find the perfect grind for my beans producing 56g of coffee over 22 seconds. Then a few days later, the love affair ended. I hadn’t changed anything (outside of the usual attempts to maintain the same tamp, weight of coffee etc.) but my coffee now constantly tastes burnt. I feel like it the grinder is burning the coffee when producing espresso grounds. I’ve tried a different bean and the same thing occurs, do you know what to suggest?
Thanks Alex! I’ve recently bought the Breville (Sage) Barista Express and have had a bit of a love hate relationship with it. It started well, managed to find the perfect grind for my beans producing 56g of coffee over 22 seconds. Then a few days later, the love affair ended. I hadn’t changed anything (outside of the usual attempts to maintain the same tamp, weight of coffee etc.) but my coffee now constantly tastes burnt. I feel like it the grinder is burning the coffee when producing espresso grounds. I’ve tried a different bean and the same thing occurs, do you know what to suggest?
Anonymous
[…] having enough coffee grinds in your basket may lead to channelling, even if you get the surface even and grind […]
[…] having enough coffee grinds in your basket may lead to channelling, even if you get the surface even and grind […]
peter dawson
nice article,thanks for sharing.
nice article,thanks for sharing.
Peter
Good info. Thanks for sharing.
Good info. Thanks for sharing.
Matilda
This is the definitive post on making espresso. So interesting. No wonder my espresso never tasted as good as those from the coffee shop.
-—————————
Matilda Barratt | Seller Support Team Manager at St George Bank
This is the definitive post on making espresso. So interesting. No wonder my espresso never tasted as good as those from the coffee shop.
-—————————
Matilda Barratt | Seller Support Team Manager at St George Bank
Anonymous
[…] How to make a great Espresso at home everytime Part I Covers: […]
[…] How to make a great Espresso at home everytime Part I Covers: […]
Anonymous
[…] visit their website. Want to know how to make the best tasting coffee at home every time? Read this blog post right now! […]
[…] visit their website. Want to know how to make the best tasting coffee at home every time? Read this blog post right now! […]
Anonymous
That’s great Alison! Thanks for your comments. Yeah, just make sure when you tap the sides that you are just knocking the grind off the sides and not too hard but it sounds like you are doing exactly the right things!
That’s great Alison! Thanks for your comments. Yeah, just make sure when you tap the sides that you are just knocking the grind off the sides and not too hard but it sounds like you are doing exactly the right things!
Anonymous
What a great article! Thanks for the explanations, it is a really worthwhile read. I’ve been polishing my grind for years, but didn’t realise that it was to interlock the grind so that the lazy water had to work harder! I’ve probably been guilty of tapping the side of the group handle a bit too roughly to dislodge the excess grind too, I’ll be mindful of that from now on.
Cheers, Alison